First Two Hot Air Balloons
We will be working on the rainbow striped hot air balloon and the green partial stripe hot air balloon (or whatever colors you chose for them).
Templates are here for the rainbow and here for the green.
Remember to download the templates to your computer before printing, print on 7x11" paper, and make sure it's set to actual size. When you measure it, the pieces should measure 10.5" wide by 14.5" tall.
Note: This is my method of paper piecing, if you prefer a different method, please use that instead.
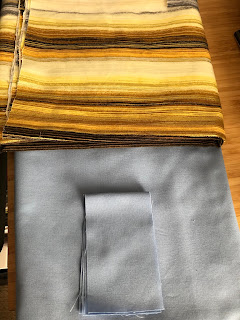
For the Rainbow Stripe Balloon you will need:

2 small triangles of background fabric (I started with roughly 4" squares and cut on the diagonal, but if you have the fabric, bigger is even better, this works great with solids and non-directional prints. This will not work for directional prints, you'll have to cut those roughly to size as you go.)
2 larger triangles of background fabric (I started with roughly 7" by 8" pieces and then cut them on the diagonal, this works great if you're using solids, you'll want to be a little more careful if you're using non-directional prints with which diagonal you cut on, and this method will not work for directional prints, you'll have to cut those roughly to size as you go.)
7 strips at least 11" wide by 3" tall in whatever colors you choose (I went with a light blue - though I probably should have done dark blue given my background color, green, orange, red, yellow, pink - would normally leave this out of a rainbow, but I'm using it for one of the balloons, and purple. Make sure you take directionality into account, you don't want sheep on their sides in the final balloon)
Note: when choosing fabrics, look at how neighboring fabrics will look next to each other. Try not to choose stuff that will blend together too much. When in doubt take a picture of the fabrics in black and white to see the volume of the fabric (white to light grey - low volume, medium gray - medium volume, dark gray to black - high volume). Good rule is not to put two pieces of the same volume next to each other, or gradate up enough so the lines are clear.

Start with your template. I like to mark which color I want where, and also which pieces are background. Then on the opposite side of your template and facing up, place your first piece (for me this was red). Use a strong light source to check that it's centered over A1 and that it covers the outside seam allowance.


Since my next fabric is directional, I first put it next to the red fabric right side up to make sure when I flip it, it will be the correct way.

Flip it down over your first piece so rights sides are together (if you're using directional fabric, your print should be upside down).

Go back to your light source and make sure the pieces overlap the first seam line (between A1 and A2) by at least 1/4". Then holding the pieces firmly in place with your hands, turn the template over, and sew along the line, starting at least 1/4" before the line and ending at least 1/4" after the line.

Now keeping the fabric in place, fold the template back along the sewn line. Turn the template so the fabric pieces are on the bottom, and the excess fabric is visible above the fold.

I like to take my ruler, and measure 1/4" from the fold, and trim it with a rotary cutter. Others prefer to eyeball it with scissors so they don't have to get up from their machine. Do what seems best.

Once the seam allowance is cut (and you didn't accidentally cut through your fabric in the process). Fold the paper template back to it's original place. Then take your block to your ironing board (I like to heat press every seam, other people prefer to finger press or using a wooden pressing tool so they don't have to get up after every seam). Again, do what works best for you. Press away from first piece so the seam allowance is pointed up (ignore all conventional wisdom about pressing to the dark).

Now repeat this process until you've added all seven non-background pieces, remembering to start with the piece print side up in the case of directional prints and then flipping it down over the most recent piece you added and checking that the pieces cover the next sewing line by at least 1/4" using your light source.


I started with the big bottom pieces. I laid them out in the direction they needed to go on the finished piece and then flipped them. Using my light source to position them more carefully.

This is where cutting big comes in handy, so you have more room to play with.

Once you sew along the line, STOP! Do not cut it yet. Make sure your seam goes all the way through the piece of fabric, flip it down so it lays across where it needs to be, and use your light source to make sure it covers all of the seam allowances. If it does not, here is your chance to seam rip and try again. If you cut the piece too small, you can always add more pieces once it is trimmed and ironed if you want to, or cut a bigger piece and try again.


Mine worked, but only barely. Make sure to check the whole seam allowance, not just the corner.
Once you're satisfied, flip the fabric back to its original position, and trim the seam allowance, double checking to make sure that your background fabric is out of the way. You will need to gently tug at the horizontal seams to fold the template paper back along the diagonal seam. Trim and iron. Note: I put the larger leftover pieces in my strap baskets. If you're worried about waste and don't like using scraps, trim your initial pieces smaller.


Once your piece is ironed flat, do another quick check to make sure the seam allowances are covered. Then add the other bottom triangle. The top smaller triangles work the same way, but they'll be a bit easier to position than the bottom triangles.

I would still recommend checking to make sure your fabric covers the whole corner and seam allowances. Next time I'll probably cut the corners bigger (maybe start with 5" squares), mine were a bit tight.

Repeat with the other top corner, check, trim, iron. Now give the whole block a good press. I prefer to keep the paper on until I'm ready to move on to the next step.

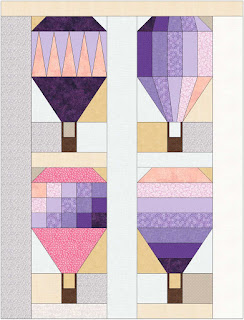
Your finished block should look something like this.
For the Green Partial Stripe Balloon you will need:


I once again took my template and marked where I wanted each fabric to go. And then also changed around the numbers. I started in the center with my high volume fabric, then added both medium volume sides at once (though you can do one piece at a time). Then added the low volume pieces at the same time. Once you're done with the center, add the solid stripes on either side. Finally add your top and bottom pieces (I left mine big on purpose, and then centered it so that the butterflies would end up in the center of the piece).

Now add your background triangles, remembering to double check your seam allowances. Give your piece one last press and admire your second finished balloon.

Comments
Post a Comment